Thursday, December 30, 2010

The Dress


I completed the dress and thankfully it doesn't look like a knock off Gordon Gartell! I used white silk dupioni and this McCall's pattern. I combined the bodice from view F and a shorten skirt from view B. It was challenging but I'm happy with the results...and it seems Chloe is too.

Saturday, December 25, 2010

Merry Christmas!


I hope you had a Merry Christmas. Mine was beautiful (and super busy). Things are still kind of busy around here so, I hope to get back to blogging soon. I have tons of things to show you guys...including the dress! Above is our Christmas card this year. I was able to get the quality and style I wanted for a fraction of the price. I love the design and styles of Tiny Prints and Minted but was looking for something more cost effective. I thought I would go with Pear Tree Greetings but couldn't find a style I felt complemented our photos. So, I went with the trusty Vista Print. I was able to get double-sided flat cards on 100lb matte paper for as little as 40cents each! To add more style and color I paired the cards with envelopes from Paper Source rather than the free envelopes that came with the cards. I was very pleased with the results, and especially pleased with the price.

Design: Hubby using PhotoShop
Printing: Vista Print
Envelopes and Labels: Paper Source

Thursday, December 23, 2010

Christmas Cookies (Project Update)


So, I have not finished the dress. I was on a roll then needed a creative change of pace. So, I have been Christmas card distributing, cookie baking, gift stenciling, Christmas brunch planning, and gift wrapping (actually I watched my hubby wrap gifts). I will post pictures of the dress soon, but until then I'll show you guys what I've been working on. Above are cookies we gave to our neighbors...a sweet treat as well as an invitation to church!

Monday, December 13, 2010

My Current Project (and Gordon Gartrell)

I am currently working on a project for my daughter--a dress. Not just a dress but a special dress. Did I mention I am giving myself less than a week to complete it? Did I also mention I've never made a dress from start to finish using a pattern? Crazy, I know. I just pray it doesn't look like a Gordon Gartrell knock off once its done. If so, I won't be posting pictures...in fact I may act as if I never even mentioned it!


Addition: After watching the clip I realize Denise and I had the same budget and time constraint (sigh). Well, at least Chloe isn't old enough to complain.

Tuesday, December 7, 2010

MIY: Christmas Wreaths

I've been busy gathering supplies and trying to block out time for Christmas crafting. I hope to make this pretty wreath from Martha Stewart before the Christmas cards start rolling in! Below are a few other wreaths, from recycled materials, if you too are feeling crafty--or if you just want to look at pretty things.

Thursday, December 2, 2010

Christmas Pictures (This Year)


Back in 2004 my good friend was getting married and invited me to attend a bridal showcase with her. While there, I was introduced to photo-journalistic photography and fell in love. I loved the idea of telling the story and emotions of the day through photography, so three years later when I got married I knew exactly what kind of photography I wanted! This style was exactly what I was looking for over the summer as I started thinking about this year's Christmas pictures. Thanks to the internet I was able to find Amy Tripple, a photographer in our area with a style I adored. She's not only a great photographer, she also is such a sweet person. My son was so comfortable with her...and so was I (I even hugged her after our session!) I'm sure Chloe would have warmed up to her too--if it wasn't 40 degrees out! Below are a few pictures from our session. Hubby was out of town on business the day of our session. Also, I took the hat I made Chloe just in case we needed it and it ended up working out perfectly! I'll be sure to give details about our Christmas cards once they're designed and ordered...my goal is chic style with a meek price tag!

Photo by Amy Tripple

Photo by Amy Tripple

Photo by Amy Tripple

Photo by Amy Tripple

Monday, November 29, 2010

Christmas Pictures (A look back)

Christmas picture 2007: Super Easy and Affordable...we used one of our favorite wedding pictures and made a photo card through Shutterfly.


Christmas Picture 2008: Easy and Affordable...gave Caleb some ornaments and snapped a few pictures. We added the words "This year our biggest gift came in the smallest package."
We used Vistaprint for printing and saved on postage by ordering postcards rather than greeting cards.


Christmas Picture 2009: A little challenging but affordable...my friend took the picture on a random bench not too far from our home. It was cold and Caleb had a hard time sitting still. We managed to get this picture after many tries. We made it black and white then added text using Photoshop, again we used Vistaprint.


Christmas Picture 2010: Details coming soon...I promise! (As soon as I figure out the details)


Monday, November 15, 2010

Turkey Time


Do you have the holidays on the brain like I do? My family travels for my annual momcation, I mean our annual Thanksgiving trip. Though with all the relatives around it does seem like a mini mommy vacation for me. I usually have only a few responsibilities: 1) nurse the baby 2) iron the tablecloths 3) watch as much HGTV as I want.

This year I was hoping to catch a 9 by Design marathon but it seems that won't be happening, thanks Bravo! But after seeing this absolutely cute idea from One Charming Party I may actually contribute a turkey to this year's celebration.

A paper one full of popcorn of course! Garrett's popcorn would be a great filling...but I might have to line the bag with plastic in order to keep the greasy goodness from seeping through.

Wednesday, November 10, 2010

Carrying Baby

Photo by ERGO baby


In my modest opinion, every mother should have a Baby Ergo Carrier. It has been a life saver! I have had many baby carriers- the Peanut Shell, the Moby Wrap, and the Snugli. I have used the Ultimate Baby Wrap and was very close to buying the Baby Bjorn. But the Ergo is my favorite. It is comfy (thanks to the padding and waist strap), versatile (you can wear it on the front, back, and on your hip), convenient (easy to get on and off), and has a hood (to protect baby from the sun AND allow for discreet nursing). I do still prefer the Moby Wrap when the baby is very small with limited head control--but after that the Ergo and I are inseparable...and so are me and my babe.

Thursday, November 4, 2010

Matchy Matchy


I have a sickness and I really need your help.

When putting together outfits I try really hard not to match too much but I can't seem to help it! In my modest opinion, I think coordinating or complimenting looks so much better than matching. I remember growing up and seeing couples matching (as in the exact same outfit) at the mall or Six Flags and I secretly vowed not to be that couple.

I love it when I see people coordinate and put colors together that wouldn't normally go together or family's that compliment each other without wearing the exact same things--oh how I long for their freedom!

If only I could just learn to coordinate and not match. "Complimentary not matchy matchy" I silently recite to myself. I remember a good friend who would only wear a gold colored shirt with her denim skirt because it had gold stitching. And another friend who would match her hair accessories with her blue jeans rather than a neutral black or white. Is it because we grew up in the 90's? Or is it a geographical thing? Above is a picture of my children (the cheesy one on the left and the "little" one being held on the right) the other cuties belong to my friend--she too grew up in the 90's and hails from Chicago. Hence, our kids all match!

I don't know--but as I try to gather the kids' outfits for our annual Christmas pictures I find myself repeating over and over again "Complimentary not matchy matchy." Do you ever have this problem? Or do you find yourself needing to match more?

Wednesday, November 3, 2010

Project: Priorities


Last week I felt like my priorities were out of whack. Things that were important, but further down on my list, were slowly taking my time and energy away from the things that mattered most. I revisited my mission statement and created a visual to post in a place I visit everyday--my refrigerator. This helps me remember whats important (as well as the order of importance)...also making it pretty encourages me to look at it more!

If you need to create a mommy mission statement to help keep things in order I suggest you visit Inspired to Action. Seriously, this blog really does inspire me to action. Above is my priority list with an abridged version of my mission statement. I used scrapbook paper, glue, and a sharpie.

Monday, November 1, 2010

Bows from Ban.do


How many different ways could you wear these bows from Ban.do? There's the obvious in the hair or on the shirt, but there are a ton of other ways too- on your shoes? on a belt? on a handbag? to close a cardigan? in a house? with a mouse? in a box? with a fox? here or there or anywhere?

Ok, so maybe they aren't as versatile as green eggs and ham but you could do a lot with them!

Monday, October 25, 2010

Personalized Aisle Runner Tutorial

Our personalized runner was by far my favorite wedding detail. A few weeks before my wedding I wanted to incorporate something personalized into our wedding decor. I came across the Original Aisle Runner and from the moment I saw it, I knew I had to have one. Back then I didn't know of anyone else really making them and well, since they were the "originals" I went for it. These women did an amazing job in a short amount of time. They were so helpful and flexible--I really did adore the final result as well as working with them. The runner for our wedding was gorgeous.

Anyway, fast forward three years and a bride I know wanted a personalized runner but was dealing with some tight budget constraints and even less time (a little over a week before the wedding). She saw some things I had made in the past and wondered if I could personalize a runner for her. Although I had never made one before, I was so excited about the challenge! My mind raced thinking, "should I use a projector to project the image on to the runner? Or, trace the image then paint?" Then, I remembered! I should try the freezer paper technique I saw over at MADE. ( Dana gives great directions, so I suggest you go over there to get a full understanding of the process from her blog.)

There are many techniques to use, but I knew my hands weren't that steady, especially after a couple shots of caffeine and holding my cuddly infant all day. So I decided I'd rather use my shaky hands to cut out a stencil rather than paint freehand on the runner and ruin it. Below is how I used a freezer paper stencil to create a personalized aisle runner.

Materials:
Runner
Poster sized Monogram
Fabric Paint
Exacto Knife
Tape
Freezer Paper
Paint Brushes
Iron
Patience (and maybe a baby sitter)


Create a monogram and have it blown up poster size. I had this done at Staples for $4.

Trace your image on the freezer paper (shiny side down). I did this in two sections. Because the middle initial and scroll would be a different color than the other initials.


While tracing the letters I wrote "save" on the inside areas of the letters I needed to keep- I also noted what letter they belong to. As you are throwing away paper these can easily be mistaken as scraps.


See why its important to keep those inside parts...those little scraps can make or break the whole thing!

Measure the aisle runner and decide where you want the monogram placed. Then unroll your runner and measure. As I unrolled one end I rolled up the other to protect it from little toddler feet waiting to trample it.

I ironed down my first stencil. And replaced the "inside pieces."

Next I began painting, being sure to place something underneath to protect my work surface (wax paper, freezer paper shiny side up, or cardboard should prevent leaks and sticking. Don't use a towel like me! ). Now, the hardest part was drying because my daughter is a cat napper I had to move quickly. I decided to use a blow dryer to dry between layers. I would suggest avoiding this if possible, I believe the dryer made the freezer paper buckle making more touching up necessary.

When it was all dry I peeled the freezer paper and did a happy dance. As expected, there were a few places I needed to touch up.
(Also, note the towel underneath my runner: do not copy ... I had to learn the hard way).

I then lined up my second stencil and ironed it on, being careful not to iron directly on the painted area.

Painted my second stencil... blow-dried, peeled, and happy danced.

The final product.


Addition:
I wanted to add a little more to the runner, so I took the last part of a poem from the wedding program and painted it towards the top of the runner. I tried to make a stencil but quickly gave up because of all the small pieces. Instead, you can trace your letters SHINY SIDE UP, place it underneath your runner, tape it down and paint directly on top. This way worked out well for the smaller font but I think I prefer the stencil for the larger letters.


Thursday, October 21, 2010

Sweet Words Giveaway!


Sometimes we need sweet words to get us through the day. Whether you work a 9-5, go to school or spend your days as a homemaker, occasionally you need encouragement in doing what you feel the Lord has led you to do. Its not always easy, but knowing that He's there, He has a plan and He loves you helps ... a whole lot. Recently a few friends of mine set out to encourage each other to recognize the progress we were making rather than focus on the things we were struggling with. The CD above was a bit of a soundtrack to remind us to "encourage ourselves." The cd is full of gospel songs that remind us of Who we serve and how He sees us -- and reminds us that we are precious in His sight.

Anyway, these "sweet words" have been a blessing to me and I would like to share it with you. Simply leave a comment telling me of a song that you listen to when you need encouragement. If you do not have an account select "anonymous" but leave your name and email address so I can contact you if you win. I will randomly select someone on Thursday October 28th to receive a copy of this cd. Also, in case you were wondering like me, from my understanding you can legally burn up to seven CD's of the same playlist according to the iTunes guidelines. So, no illegal stuff going on here!

Wednesday, October 20, 2010

Petunia Pickle Bottom Outlet Sale

Almost two years ago I grew sick of searching through my bottomless purse-turned-diaper bag looking for wipes or car keys only to find the bottom of my bag was wet from the leaking Sippy cup (gross). It was then that I decided I needed an actual diaper bag. The first diaper bag I carried was a Petunia Pickle Bottom. I found it on Ebay (NWT) for a fraction of the price. I wondered "How are these people selling these bags so much cheaper than the regular price?" Then, I saw one for sale with an upside down logo tag- aha! I cracked the case ... there must be an outlet store. Imagine my surprise when I learned the outlet wasn't a store that was completely out of reach (e.g. Pottery Barn Kids Outlet ). It was an online outlet that was available to all. The only catch was that its only available a couple of times a year. Well, its that time of year again and you should check it out!

Petunia Pickle Bottom is having one of their lovely outlet sales. You can get a great diaper bag for 30%- 60% off retail prices. The sale begins today at 9am PST. One of these bags would be a great baby shower gift or Christmas gift for a mom. I wonder if they will have any of the new Sashay Satchels available-- you never know!

Monday, October 18, 2010

Coming Soon...


What do pretty writing, personalization, and weddings have in common-- besides being things I'm in to? Well, they are all part of my current project. More details coming soon!

For fun and your viewing pleasure above is a picture of my church from my wedding day. It features one of my absolute favorite details from my wedding and inspiration for my current project.

Okay, I've already said too much. Stay tuned!


Wednesday, October 13, 2010

Aprons!


There are varying views on aprons: some see them as a garment used to protect clothes while others see them as some blast from the 1950's past that they would rather not relive. Personally, I believe aprons can be useful, chic and speak a thousand words.

An apron can say, "Yes this is my job ... and I love it! I am prepared to wipe my hands (or kids noses) with out missing a beat." It says I'm proud to be a keeper at home.

Actually, my apron -- the one I sewed a couple of years ago -- is hanging on the wall saying "I'm too pretty to be used." Its not that I don't need to wear it, I just can't bring myself to get anything on it! Anyway, I recently joined up with some blogging ladies for an "apron swap" and I hope I can bring myself to actually wear mine. I have an apron full of pastels, polka dots, and shabby chicness in mind for my partner. I just need to get my ideas through to my sewing machine!

In the meantime, if you're interested in sewing an apron, check out this book. It has lots of cool ideas, but be sure to check out the publisher's site for corrections -- it also has lots of mistakes! But once you get everything figured out, you will definitely have some cute results. The apron above is one I made using a pattern from that book.

Tuesday, October 12, 2010

Cardigan to Ruffle Shrug

I recently turned a cardigan, which was destined for the Salvation Army, into a ruffled shrug using this tutorial for inspiration. I decided to make the bottom a little more curved making it more like a shrug rather than a jacket. I also used the remaining fabric for the ruffles rather than buying additional fabric. You should give it a try, the tutorial is easy to follow and the results are great!

Before:

After:

Monday, October 11, 2010

Diaper Bag, for Mama not Baby


Gone are the days of my cute little purses. And I don't carry a purse and a diaper bag. In my (modest) opinion the diaper bag is my purse. No, its not a small bag for money as defined by Merriam Webster. Its a huge bag full of necessities for my children and myself (and occasionally my husband). I do not let the gender of my child dictate the color since I am the one carrying it, not them. I used to like handbags but now the stakes are higher- the number of pockets, the material, the accessories. I've become a diaper bag connoisseur.

My current favorite is my brown Kate Spade (KS) Stevie Baby Bag, which was my Mother's Day gift last year. The year before that I received a Petunia Pickle Bottom (PPB) touring tote. We got great deals on both bags, thanks to the outlet mall and Ebay, as they can both be a little pricey. I like the versatility of the PPB and the classic style and size of the KS. Although I'm not angling for a new one, the PPB Sashay Satchel is really cute...and more affordable! (Hubby I hope you're reading this -- and just in case you are -- Mia Bossi makes nice diaper bags too.)

Wednesday, October 6, 2010

Mum's the Word


Shhh, don't say anything but I adore the wreath above! Well, I guess it's no secret-- I'm in to nice paper, uncommon flowers, and ribbon. So, imagine how excited I was when I came across this new fall Mums Wreath Kit from Paper Source. The paper, the ribbon, the flowers, and the fall color palette...

Ahh, fall-yet another thing I'm in to.

Wednesday, September 29, 2010

Pat in the Hat Tutorial

One of my KCWC projects was a hat for my daughter. When my hubby saw me making the pattern he said "make those ear flaps like Pat has." (Pat is my husbands friend who wears a winter hat with ear flaps- that my husband has made fun of on more than one occasion. ) I guess he likes ear flaps on little girls more than grown men. So, here's the Pat in the Hat tutorial!

Materials:
Pattern (add 5/8 inches to Large for 6-12 months)
1/4 yard of knit material
Matching thread
Sewing machine
Ball point needle for sewing machine
Grosgrain ribbon (optional)


1) Fold material in half and place pattern on top. Cut two pieces, one will be your "lining" and the other will be your "outer layer". (Side note: I used the same fabric for both pieces, but you can use different ones) When unfolded it should look like this:

2) Match triangles on the top of your outer layer and pin. Sew the two seams. Repeat this on your lining.

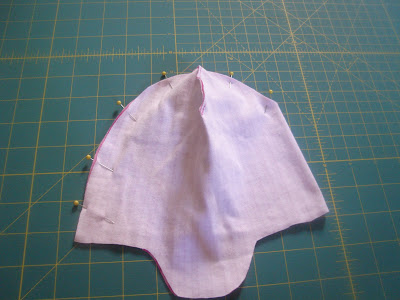
3) Once you've sewn your two seams it should look like this when unfolded:


4) Now, match up your ear flaps, pin, and sew. (Only sew were the pins indicate below) Repeat on your lining.

5) You should have something that resembles a hat:
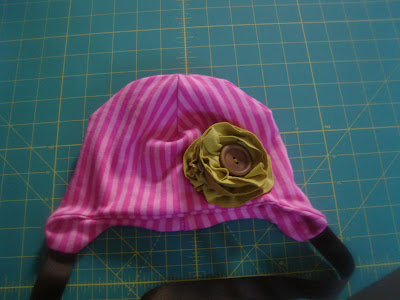
6) Now the fun part: Embellish you outer layer!

7) Place your lining and outer layer right sides together. If adding a ribbon now is the time. Place your ribbon at the ear flaps.

8) Pin outer layer and lining right sides together (leave and opening near back seam- where I placed my horizontal pin below)

9) Turn hat right side out through opening.


10) Fold under opening and pin. Top stitch around entire hat close to the edge.

11) Enjoy!